The Science Of Scientific Writing Set 1 Set 1-Argument Parts : Second Page : Third Page : Example : Exercise 1 : Exercise 2 : Exercise 3 : Exercise 4 : Exercise 5 : Final Page - Set 1.
OVERVIEW: The way to well-written science
PART I: Paragraphs and Sentences
SET A: Paragraphs: The Maps Behind Them
SET B: Paragraphs: Using Maps to Meet Readers' Expectations
SET C: Paragraphs with Something Extra: Points and Tails
SET D: The Generic Section: Expectations and Maps as Blueprints
SET E: Scientific Sections: The Methods and Results
SET F: Scientific Sections: The Discussion
SET G : Scientific Sections: The Introduction
SET H : Sentences
SET I : The Paper as a Whole
PART II: The Paper and its Sections
SET 1: Argument Parts
SET 2: Indicator Words
SET 4: Locating Arguments in Prose
SET 5: Rationale's Essay Planner
SET 6: Evidence in Arguments: Basis Boxes
Synthesis 1: Position-Early Paragraphs
Synthesis 2: Position-Final Paragraphs
Synthesis 3: Writing a Discussion I
Synthesis 4: Writing a Discussion II
Exercise 3
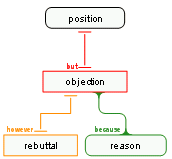
1. Make TWO Rationale Reasoning maps of this form:
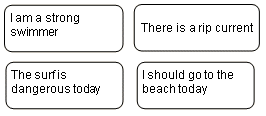
Use for FIRST map, these claims:
Drag this image onto the workspace to proceed. You must be using the inbuilt browser in Rationale 1.3 or later. |
|
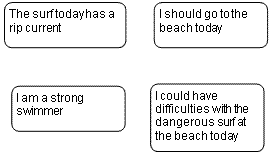
and for the SECOND map, these claims:
Drag this image onto the workspace to proceed. You must be using the inbuilt browser in Rationale 1.3 or later. |
|
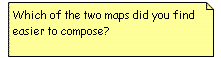
Finally, drag the image below onto the workspace and inside it type your answer to the question. The image will create a Rationale NOTE box, which can be expanded by dragging its edges. Once it's on the wokspace, just double-click the Note box, and the cursor will appear inside.
If you ever have any other comments or queries you want to add yourself, just create a new note (e.g. by right-click, New, Note) and go for it!
Hints:
- Identify the positions. It helps to ask: does this box contain the main issue, or is it a claim that suggests we should believe another claim is true or false?
- Work out which is the upper level objection: this claim directly undermines the position. Turn this claim into a red objection and add it to the map under the position.
- Work out which is the lower level objection: this claim undermines the other objection. Turn this claim box into a red objection, and when you connect it under the existing objection it will automatically convert to an orange rebuttal box.
- The remaining claim must be the reason that supports the upper level objection, that is, a reason for thinking that objection is a good one
2. Check your work against the models.
{![]()
![]()
Content of this page drawn in whole or part from the Austhink Rationale Exercises with permission from Austhink.